
The fastest way to take a screenshot on Mac is by using keyboard shortcuts: Command + Shift + 3 captures the whole screen, Command + Shift + 4 lets you select an area, and Command + Shift + 5 opens the full screenshot toolbar. Once you know these, you can capture anything on your screen in seconds.
Let’s break this down step-by-step so you’ll never fumble for the right keys again.
What Is the Easiest Way to Take a Screenshot on Mac?
The easiest method is using built-in keyboard shortcuts that instantly capture your screen without opening any apps.
Here are the three you’ll use 90% of the time:
- Command (⌘) + Shift + 3 → Capture the entire screen
- Command (⌘) + Shift + 4 → Capture a selected portion
- Command (⌘) + Shift + 4, then Spacebar → Capture a specific window
Think of these shortcuts like camera modes on a phone — full photo, crop mode, and portrait mode for windows.
How to Take a Screenshot on Mac Using Keyboard Shortcuts?
Mac screenshots are controlled entirely through simple key combinations that tell your computer what part of the screen to capture.
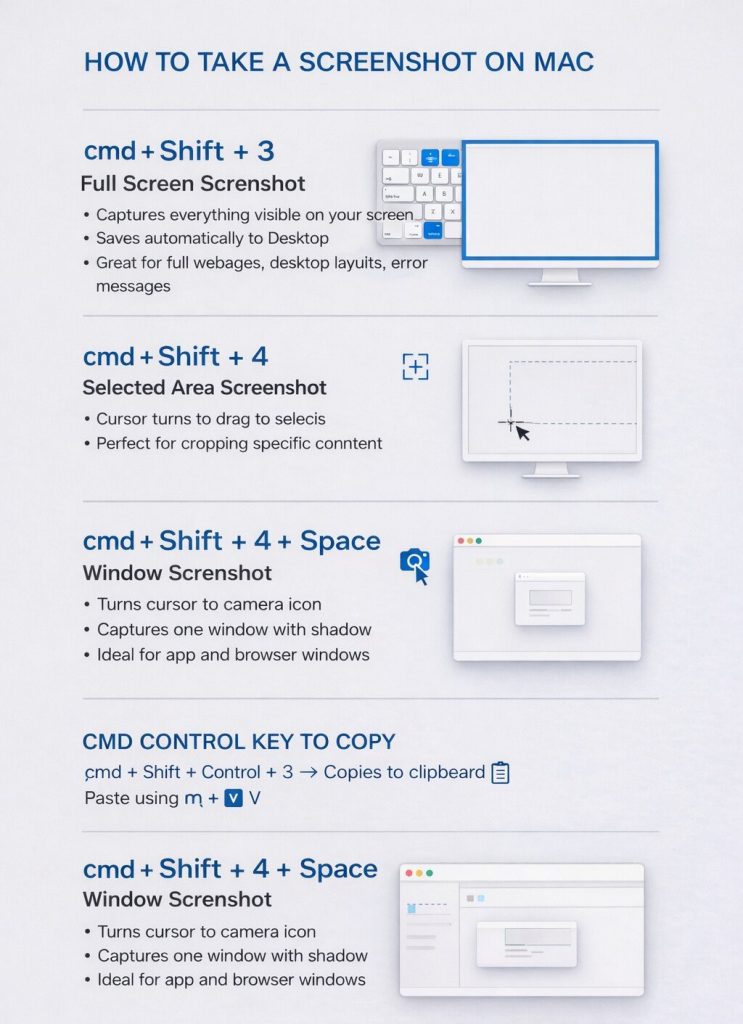
Command + Shift + 3 (Full Screen Screenshot)
This captures everything visible on your screen.
Steps:
- Press ⌘ + Shift + 3
- You’ll hear a camera shutter sound (if sound is on)
- Screenshot saves automatically to your desktop
Great for saving:
- Full webpages
- Desktop layouts
- Error messages
Command + Shift + 4 (Selected Area Screenshot)
This lets you draw a box around exactly what you want to capture.
Steps:
- Press ⌘ + Shift + 4
- Your cursor turns into a crosshair
- Click and drag to select area
- Release mouse to capture
Perfect for:
- Cropping part of a webpage
- Capturing an image without extra clutter
- Highlighting specific info
Command + Shift + 4 + Space (Window Screenshot)
This captures one specific window with a clean border and shadow.
Steps:
- Press ⌘ + Shift + 4
- Tap the Spacebar
- Cursor turns into a camera icon
- Click the window you want
Amazing for:
- App windows
- Finder folders
- Browser windows
How to Copy a Screenshot to Clipboard Instead of Saving?
Add the Control key to copy instead of save.
Example:
- ⌘ + Shift + Control + 3 → Copies full screen
- Paste using ⌘ + V in Messages, Mail, Docs, etc.
Key Takeaway: Shortcuts make how to take a screenshot on Mac feel instant — no apps, no menus, just click and done.
How to Use the Mac Screenshot Toolbar?
The screenshot toolbar is a visual control panel that lets you capture, record, and customize screenshots.
Open Screenshot Toolbar
Press: Command + Shift + 5
A control bar appears at the bottom of your screen.
Toolbar Options Explained
| Icon | Function |
| Full Screen | Capture entire display |
| Selected Window | Capture one window |
| Selected Portion | Capture a dragged area |
| Record Entire Screen | Screen recording |
| Record Selected Portion | Partial screen recording |
How to Set a Screenshot Timer?
Click Options → Timer → 5 or 10 seconds
Helpful when you need to capture:
- Dropdown menus
- Tooltips
- Hover effects
Where Screenshots Save from the Toolbar?
Click Options → Save to
You can choose:
- Desktop
- Documents
- Clipboard
- Custom folder
Key Takeaway: The toolbar is the “control center” version of how to screenshoot on Mac when you want more flexibility.
Where Do Screenshots Go on a Mac?
By default, screenshots are saved to your Desktop with a timestamped filename.
Example:
Screenshot 2026-02-04 at 10.45.33 PM.png
To quickly find them:
- Look on Desktop
- Or search “Screenshot” in Finder
You can change this anytime using Command + Shift + 5 → Options.
How to Change Where Screenshots Are Saved on Mac?
You can permanently change the save location using the screenshot toolbar.
Steps:
- Press ⌘ + Shift + 5
- Click Options
- Select a new location or choose Other Location
Pro tip: Create a folder called “Screenshots” to keep your desktop clean.
How to Edit a Screenshot on Mac After Taking It?
Mac shows a small preview thumbnail that lets you edit instantly.
Using the Floating Thumbnail
After taking a screenshot:
- Click the small preview in the corner
- Markup window opens
You can:
- Crop
- Draw arrows
- Highlight text
- Add shapes or signatures
Using Preview App for More Edits
Open screenshot in Preview for:
- Resizing
- Changing file format
- Adjusting colors
- Exporting as PDF
Key Takeaway: Knowing how to take a screenshot on Mac is step one — editing makes it useful.
How to Take a Screenshot of a Menu or Dropdown on Mac
Use the timer feature in the screenshot toolbar to capture menus before they disappear.
Steps:
- Press ⌘ + Shift + 5
- Click Options → 5-second timer
- Click capture button
- Open your menu before timer ends
Boom — menu captured.
How to Take a Screenshot on Mac Without Keyboard Shortcuts?
You can use built-in apps like Preview if you don’t want shortcuts.
Using Preview
- Open Preview
- Go to File → Take Screenshot
- Choose:
- From Selection
- From Window
- From Entire Screen
- From Selection
Great for beginners who prefer menus over keys.
Why Your Mac Screenshot Shortcut Might Not Be Working
Screenshot problems usually come from keyboard settings, storage issues, or permission restrictions.
Check Keyboard Shortcuts
Go to:
System Settings → Keyboard → Keyboard Shortcuts → Screenshots
Make sure shortcuts are enabled.
Check Storage Space
Mac won’t save screenshots if storage is full.
Restart Your Mac
Yes, the classic fix still works surprisingly often.
Can You Change Screenshot File Format on Mac?
Yes, Mac saves screenshots as PNG by default, but you can switch to JPG, PDF, or TIFF using Terminal.
Example command (advanced users):
defaults write com.apple.screencapture type jpg
killall SystemUIServer
Now screenshots save as JPG.
How Do You Take a Scrolling Screenshot on Mac?
Mac doesn’t have a built-in full scrolling screenshot for all apps, but browsers offer this feature.
In Safari
- Take a normal screenshot of webpage
- Open it in Preview
- Select Full Page option
In Chrome
Use Developer Tools → Capture full size screenshot.
Final Thoughts
Learning how to take a screenshot on Mac is like unlocking a productivity superpower. Whether you’re saving receipts, reporting bugs, sharing memes, or creating tutorials, screenshots help you communicate visually in seconds.
Start with the three main shortcuts, explore the toolbar when you need more control, and tweak save locations to stay organized. Once it becomes muscle memory, you’ll wonder how you ever worked without it.
Frequently Asked Questions
Use Control with your shortcut to copy to clipboard, then paste using Command + V.
Press the Escape (Esc) key before releasing your mouse.
Yes, hold Option while clicking a window to remove the shadow.

